So this was just way too cool to not have a crack at! When VMware announced Project Monterery and with that the ESXi on ARM port it was just a matter of time before they would announce a Fling that works with the Raspberry Pi 4 (with its Broadcom based ARM Chip!).
Lets just talk a little bit about why VMware has launched Project Monterery. x86 is reaching its limit. Servers are going to need network and data processing on box and outside of the traditional x86 CPU / CPU Core(s). Putting a Smart NIC with an ARM chip into a bunch of servers that run their own instance of ESXi allows for network functions to be offloaded from the CPU. A specific example of this would be VMware NSX running the distruted firewall / DDoS protection on the Sart NIC ARM chip and in turn freeing up the cycles on the main x86 CPU. I also think there will be Data Processing Units on these Smart NICs to allow for processing of datasets for applications like AR / ML etc. Were going to see a massive change in servers in the next decade and this is just the start. Anyways lets dive into the RPi4 lab!
You will need the following:
– A Raspberry Pi 4 Model B, 8GB version, with 5v PSU.
– USB 3.0 to Sata convertor
– Micro HDMI to HDMI male cable.
– Mini SD Card to boot the EFI firmware
– USB flash drive to boot the ESXi Installer
– Sata SSD flash drive.
– RPI offical image
– EFI firmware
– ESXi Fling

Note that you need to first setup the Mini SD card with the offical image and update EEPROM. Then after this is done you can wipe the Mini SD card and install the bootable EFI Firmware on it. Note that the Rpi always needs the bootable EFI firmware to be able to boot ESXi. I missed this part out on my first try. High level process is as follows:
1. Ensure the Raspberry PI EEPROM is updated. Prep the Mini SD with the RPI official image, boot it and run the command in a terminal window:
sudo rpi-eeprom-update

sudo rpi-eeprom-update -a

sudo reboot
2. Prep the Mini SD card with the EFI firmware on your Windows PC.
Download the latest offical RPi firmware.
Download the latest community RPi UEFI firmware.
Format the Mini SD card to a FAT32 partition and label it UEFI. Extract the firmware master.zip and delete the files starting with kernel*.img within the firmware-master/boot directory. Copy all the files in the boot directory to the root of the Mini SD card. Now extract the UEFI firmware and copy all files to the root of the Mini SD card, confirming any overwrites.
3. Make sure the Mini SD card is plugged into the Pi 4. Cable up a keyboard and Micro HDMI to a screen and boot the Pi. Press ESC on the black Pi logo.
4. Change the boot order in the EFI firmware to move the USB flash drive up to first. Browse to Device Manager > Raspberry Pi Configuration > Advanced Configuration > Limit RAM to 3 GB – change this to Disabled. To save the settings press F10 and Y to confirm. Pressing Enter will reboot the Pi.
5. Make sure your USB 3.0 to sata cable is plugged into the pi with the sata SSD drive on the other end (and its in a USB 3.0 blue port).
5. Ok now you have to prep your Bootable USB ESXi Installer. Take your USB stick and run either Rufus or UNetbootin and image the ISO on the the USB stick. Plug it into your PI and turn your pi on. Press ESC again to bring up the UEFI firmware config and select Boot Manager. Select your USB stick to boot. When the ESXi install launches press SHIFT + O to bring up the console and append:
autoPartitionOSDataSize=8192
This will make an 8GB VMFS-L partition for ESXi and leave the rest available as a datastore. Now press enter to boot the ESXi Installer.
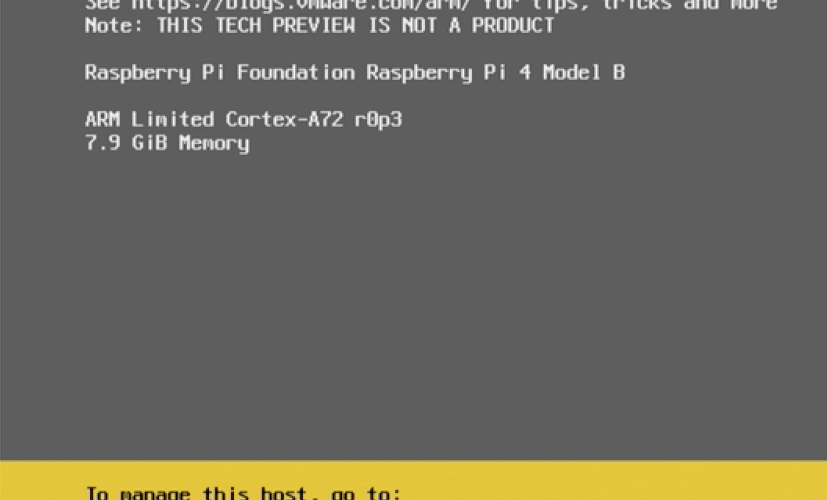
6. From here it is just a standard ESXi install, select the SSD drive for the installation. After you have installed ESXi you can do away with your USB key as ESXi is installed on your SSD with its 8GB partition. I did have to reboot and go back into the UEFI config and change the boot order to the SSD (as first in the boot manager).

It seems to work pretty well. I installed Ubuntu 20.04.1 Arm version on a VM workload with 2vCPU and 2GB of ram no problems and it didnt run the Pi to its max. One thing I did notice when labbing this is that the Pi gets hot. I will need to get a proper case and active cooling for it if i were going to use this ESXi as a permanent host.
Comments