In this tutorial I will go over the steps to setup an Ubuntu network probe hosted on a VMware ESXi server utilising Cisco Remote Switchport Analyser (RSPAN).

Lets break down the components:
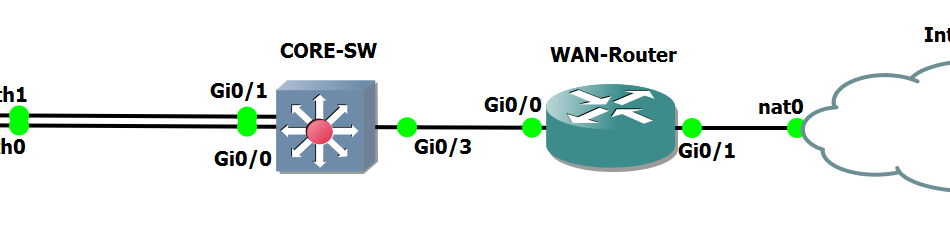
Switch – Cisco Catalyst L3 switch with RSPAN configured. In this example we span the WAN uplink interface to the RSPAN VLAN.
Hypervisor – VMware ESXi and vSwitch with 2 portgroups, one for mgmt and one for rspan.
Virtual Machine – Ubuntu Server (can be any version really). We need two VMXnet3 network adapters – one for management of the VM and one for the RSPAN.
The network is a collapsed core with a layer 3 routed uplink to the WAN circuit. The purpose of remote spanning the wan uplink is to be able to analyse the traffic in the VMware environment. RSPAN allows you to analyse traffic anywhere in the network that a L2 VLAN can exist. This allows troubleshooting to be mobile. SPAN is quite simply a copy of the traffic, so it is important to note that if you use SPAN you need to make sure your doing it on a platform that can support the load. For example I have done this on both Cisco Nexus and Dell Force 10 hardware for 100mbit WAN circuit in production and had no issue. It is best to lab a technology such as SPAN first before putting it into production. This allows you to get used to it and understand how it works. SPAN requires the actual switch ASIC hardware so you can’t run this with GNS3 or CML, it needs to be physical kit.
Switch
1. Below is the switch configuration (Cisco Catalyst IOS-XE syntax):
CORE-SW(config)#vlan 901

CORE-SW(config-vlan)#remote-span

CORE-SW(config-vlan)#exit

CORE-SW(config)#

CORE-SW(config)#monitor session 1 source interface Gi0/3

CORE-SW(config)#monitor session 1 destination remote vlan 901

CORE-SW(config)#wr

CORE-SW(config)#exit
2. Ok so what have we done here? Configured vlan 901 as rspan and set the monitor session up with source interface of our WAN uplink (Gi0/3). By default both tx and rx are included on the monitor session CLI commands unless you specify one or the other. So we will get both directions of traffic from source interface Gi0/3.
Hypervior
1. Configure the ESXi vSwitch port groups. One for the mgmt with standard settings, including vlan tag if the port is a trunk. Configure an RSPAN port group and set the RSPAN VLAN tag of 901, which we configured on the Cisco Switch previously.
2. Go to the properties of the RSPAN port group and security tab. Enable accept for Promiscous Mode, MAC Address Changes and Forged Transmits. This is depicted below:

Virtual Machine
1. Download Ubuntu Server ISO and build a VM. Specs of 2vCPU, 4gb memory, 80gb disk, 2x VMXnet3 network adapters. Set one adapter to mgmt port group and the other to RSPAN port group.
2. Install Ubuntu Server, follow the wizard and do post install. Set your management IP on the mgmt network interface.
3. Upon post install, do a sudo apt update and sudo apt upgrade. Install iptraf-ng and tshark from apt.
administrator@tawnos:~$ sudo apt install iptraf-ng

administrator@tawnos:~$ sudo apt install tshark
Analysis with IPtraf-ng and Tshark
Now we can view the top traffic in out of our network with iptraf-ng:
administrator@tawnos:~$sudo iptraf-ng
Select Configure and set Force promiscuous mode to On.
Now select Exit Configuration.
You have both the ability to use IP Traffic Monitor or Detailed Interface Statistics. Select IP traffic monitor > ens192 (or your rspan interface). Use the keys ‘S’ and ‘B’ to sort traffic by byte count. As a Network Engineer Iptraf makes it really easy to see which IP is chewing up all the bandwidth.


We can also do the same with tshark. Lets say for example we want to capture packets to and from a host IP:
administrator@tawnos:~$mkdir captures

administrator@tawnos:~$sudo chown root:root captures/

administrator@tawnos:~$cd captures/

administrator@tawnos:~$sudo tshark -i 2 -f "host 10.2.0.10" -w test.pcap
Now generate traffic between the host and the WAN circuit, or if your troubleshooting just wait for the packets to collect. In this example we are going to do a DNS lookup to a remote server 10.2.0.10 for google.com. Lets view the capture now with tshark and grep the remote server:
administrator@tawnos:~$sudo tshark -r test.pcap | grep 10.2.0.10

Sweet, it works. I hope this tutorial has assisted you to build your own Linux probe with RSPAN.
Comments